Is it difficult for you to take a screenshot on your MSI laptop? Fear not, as it’s a simple process that you can master in no time! Whether you need to capture an important document or a funny meme, taking a screenshot is a useful skill to have. In this guide, I will show you how to screenshot on msi laptop step-by-step.
Firstly, let’s examine the different methods of capturing your screen. There are several ways to take a screenshot on an MSI laptop, including using the keyboard shortcut, the snipping tool, or a third-party software. The keyboard shortcut is the most common and straightforward method. By pressing a few keys simultaneously, you can capture your screen in seconds.
Use the keyboard shortcut “Windows” + “Print Screen” to capture a screenshot. In this case, the screenshot will be saved under a subfolder called “Screenshots” under your “Pictures” folder. If you want to take a screenshot of only a specific area, you can use the snipping tool. Type “snipping tool” in the search bar, select the area to be captured, and save the image. Follow these simple steps and you’ll be able to take screenshots on your MSI laptop in no time!
How to Screenshot on MSI Laptop?
Capturing a screenshot is a useful tool for many different purposes, such as saving important information, capturing a funny meme, or troubleshooting issues on your MSI laptop. This guide will provide you with the most common methods for capturing screenshots.
Using Keyboard Shortcuts
Taking a screenshot on your MSI laptop is a simple process that can be done quickly using the keyboard shortcut method.
Step 1: Locate the “Print Screen” Key
On most keyboards, the “Print Screen” key is part of the top row, either labeled as “PrtScn” or “Print Screen.” Depending on your keyboard, it may be labeled differently, so take a moment to locate it before proceeding.
Step 2: Press the “Windows” Key
The next thing you need to do is locate the “Windows” key on your keyboard. In most cases, a Windows logo can be found in the lower left corner of the keyboard near the bottom left corner.
Step 3: Take the Screenshot
Once you have located both the “Print Screen” and “Windows” keys, press them simultaneously. Once the screenshot has been taken, the screen will flicker briefly.
Step 4: Locate the Screenshot
After taking the screenshot, you can locate it in your “Pictures” folder. Open File Explorer and navigate to “Pictures,” and then look for a subfolder labeled “Screenshots.” The screenshot will be saved here automatically.
Step 5: Edit and Save the Screenshot (Optional)
It is possible to edit the screenshot before you save it by using the Windows Paint program that is built into Windows. Open the screenshot in Paint, and then use the editing tools to make any necessary changes. Once you are done, click “File” and then “Save As” to save the edited screenshot to your desired location.
Using MSI’s Dragon Center
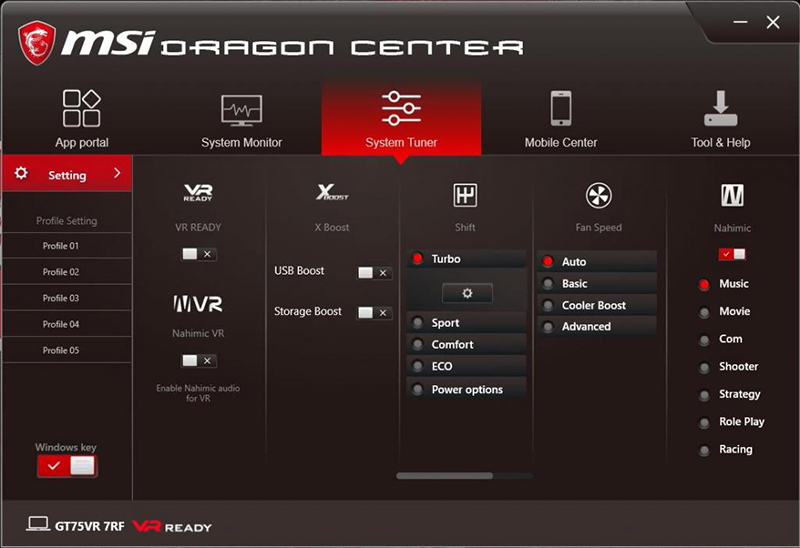
Using MSI’s Dragon Center software, you are able to take screenshots in just a few clicks, allowing you to save your valuable time.
Step 1: Open MSI Dragon Center
To begin, open the MSI Dragon Center software on your MSI laptop. You can find this application in the Start menu or by clicking on the Dragon Center icon in your system tray.
Step 2: Select “System Monitor”
Once the MSI Dragon Center is open, select the “System Monitor” tab. This tab will show you the current system status, including CPU usage, GPU usage, and memory usage.
Step 3: Click on “Screen Capture”
In the “System Monitor” tab, you will see a “Screen Capture” button at the bottom. You can open the screen capture settings by clicking on this button.
Step 4: Configure Screen Capture settings
The “Screen Capture” settings allow you to configure how you want to capture screenshots on your MSI laptop. If you want to capture a specific area on the screen or the whole screen, you can choose that option. You can also set the file format and quality of the screenshot.
Step 5: Take a Screenshot
By clicking on the “Capture” button after configuring the screen capture settings, you can take a screenshot. You will be able to find the screenshot in your default Pictures folder.
Step 6: Access your Screenshots
To access your screenshots, open the Windows File Explorer and navigate to your default Pictures folder. You will find your screenshots saved in this folder with a filename that includes the date and time of the screenshot.
Related Post: How to Take a Screenshot on Gateway Laptop?
Using Snipping Tool

Fortunately, Windows 10 offers a built-in snipping tool that allows you to capture screenshots easily.
Step 1: Open the Snipping Tool
The first thing you need to do is open the Snipping Tool. Clicking on the Start menu and typing “snipping tool” in the search bar is one of the easiest ways to do this. In order to launch it, click on the Snipping Tool app.
Step 2: Choose the Type of Snip
You will find a menu at the top of the Snipping Tool once it has been opened. It features four options: Free-form Snip, Rectangular Snip, Window Snip, and Full-screen Snip. Choose the type of snip that you want to take by clicking on the corresponding button.
- Free-form Snip: Helps you to select an area from a larger picture by drawing a shape around what you want to capture.
- Rectangular Snip: Measure the perimeter of the area you want to capture using a rectangle.
- Window Snip: Captures specific windows, such as programs or folders.
- Full-screen Snip: Captures everything on your screen.
Step 3: Take the Snip
As soon as you have chosen the type of snipp you want to take, the Snipping Tool will dim the screen and display crosshairs. The crosshairs on your mouse can be used to select the area of the screen that needs to be captured. When you release the mouse button, the snip will be captured.
Step 4: Edit the Snip (Optional)
After you have taken the snip, the Snipping Tool will open an editing window where you can annotate, highlight, or crop the image. It is optional, but it may be useful if you want to emphasize a particular section of the screenshot. The saved image will appear once you finish editing the snip.
Step 5: Save the Snip
When you are ready to save the snip, click on the File menu in the Snipping Tool and select Save As. Once you have selected the location and file name for the screenshot, click Save.
Using the Game Bar

If you are using an MSI laptop, there are several ways to take a screenshot, but one of the easiest and most efficient ways is through using the Game Bar.
Step 1: Enable the Game Bar
On your MSI laptop, you must ensure that Game Bar is enabled before you can take a screenshot. You can do this by pressing “Windows key + G” on your keyboard. In this case, you should be able to access the Game Bar. If this is the first time you’re using the Game Bar, you might see a prompt asking if you want to enable it. To enable it, simply click “Yes, this is a game.”.
Step 2: Take a Screenshot
Once the Game Bar is enabled, taking a screenshot is a breeze. When you are ready to take a screenshot, press the “Windows key + Alt + PrtScn” on your keyboard. Using this method, an image of your screen should be captured and saved to your default Pictures folder. If you want to save the screenshot to a different location, you can click on the “Show all captures” button in the Game Bar and select “Open folder” to access the folder where your screenshots are saved.
Step 3: Customize Your Screenshot
If you want to customize your screenshot, such as adding annotations or cropping the image, you can do so using the Snip & Sketch app, which is built into Windows 10. By clicking the “Show all captures” button on the Game Bar, you can do this. From there, select the screenshot you want to customize and click on the “Edit & share” button. By pressing this button, you will be able to edit your screenshot in the Snip and Sketch app.
Step 4: Share Your Screenshot
You can share your customized screenshot with others once you have taken it and customized it. You can do this by opening the Game Bar and clicking on “Show all captures.”. Once you have done that, you can select the screenshot that you wish to share and click on the “Share” button on the right. This should bring up a list of apps and services you can use to share your screenshot, such as email, social media, or cloud storage.
Common Issues with Taking Screenshots on MSI Laptop
Taking screenshots is a useful feature that comes in handy for various purposes, such as capturing important information or sharing your progress in gaming or work. It is possible that you will encounter some problems when you take screenshots on your MSI laptop. In this guide, we will discuss some common problems you might encounter when taking screenshots on your MSI laptop and provide possible solutions to address them.
Blank or Black Screen
If you are taking a screenshot and end up with a blank or black screen, it is likely due to a compatibility issue with your graphics card or display driver. To resolve this issue, you can try updating your display driver or resetting your graphics settings. Additionally, make sure that the program or window you want to capture is active and not minimized or closed.
Unresponsive Keyboard Shortcuts
If you find that the keyboard shortcuts you are using to take screenshots are not working, it could be due to a malfunctioning keyboard or a problem with your operating system. Try restarting your laptop or checking your keyboard settings to ensure that the keys are properly configured. Alternatively, you can try using third-party software or the Windows Snipping Tool to take screenshots.
Screenshot Not Saving
If you take a screenshot but cannot find it in your designated location, the issue may be due to a problem with your file system or storage device. Check if there is sufficient space in your default storage location, or try saving the screenshot to an external hard drive or cloud storage. Additionally, you can try resetting your default storage settings or repairing your file system.
Low-Quality Screenshots
If your screenshots appear blurry or low-quality, it may be due to a problem with your display settings or image format. Try adjusting your display resolution or color settings to improve the quality of your screenshots. You should also avoid over-compressing screenshots and save them in a high-quality format, like PNG or JPEG.
Final Words
MSI laptops have a screenshot feature that you can use to share and save important information. A Screenshot on MSI Laptop can be taken by pressing the “Windows” key and the “Print Screen” key simultaneously on an MSI laptop. As a result, the entire screen will be captured and saved in the default “Screenshots” folder. It is possible to capture specific areas of the screen by using the shortcut “Windows” + “Shift” + “S,” which opens the Snipping Tool, which has the ability to select a specific area of the screen that you wish to capture.
Also Recommended: How to Use Hisense TV Without Remote or WiFi?
FAQs about How to Screenshot on MSI Laptop
Here are some FAQs of How to Screenshot on MSI Laptop:
How do I take a screenshot on my laptop with the Shift key?
Taking a screenshot on your laptop with the Shift key is another option if the Windows key + PrtSc keyboard shortcut does not work. This method requires you to press the Shift key along with the Windows key and the S key at the same time. By doing this, you will be able to take screenshots of any part of your screen using the Snipping Tool.
How do I take a screenshot if my PrtSc is on Shift?
If your laptop has a PrtSc key that is also mapped to the Shift key, taking a screenshot can be a bit tricky. The Snipping Tool can be used in this situation. You can do this by pressing the Windows key and typing “snipping tool” into the search box. You can take a snip by selecting the type of snip you want, clicking on the New button, then selecting the area where you want the snip to be taken. Now, you can save the screenshot to your computer by clicking on the Save button.
Can I edit my screenshots on a gaming laptop?
Yes, you can edit your screenshots on a gaming laptop using built-in tools or third-party software. Windows 10 comes with the Paint 3D app, which you can use to edit your screenshots. Simply open the screenshot using the Paint 3D app and use the tools provided to crop, resize, or add annotations to your screenshot.