Welcome to the ultimate guide on how to buy a projector. Whether you’re a movie buff, a gamer, or a professional in need of a presentation tool, finding the perfect projector involves considering various factors. In this comprehensive article, we’ll walk you through the essential aspects, providing insights, recommendations, and answering frequently asked questions. Let’s embark on this journey to enhance your visual experience.
Choosing the Right Type of Projector
Understanding the diverse types of projectors is crucial for making the right purchase.
LED vs. LCD Illuminating the Differences
In this section, we delve into the distinctions between LED and LCD projectors. Learn about their advantages, drawbacks, and which one aligns better with your needs. Discover how to buy a projector that suits your specific requirements.
Resolution Matters Crisp and Clear Images
Projector resolution significantly impacts image quality.
Full HD or 4K Decoding the Pixel Jargon
Explore the nuances of Full HD and 4K resolutions. Understand the impact on image clarity and determine the optimal choice for your viewing preferences. Elevate your visual experience by making an informed decision on how to buy a projector?
Brightness: Shedding Light on Lumens
Brightness is a key factor affecting visibility, especially in different environments.
Lumens Demystified Finding the Right Brightness Level
Uncover the mystery of lumens and how they influence picture brightness. Determine the suitable lumens range for your usage scenario, whether it’s a home theater or a well-lit conference room. Enhance your understanding of how to buy a projector that meets your brightness needs.
SUGGESTED POST : How to Use Samsung DeX?
Contrast Ratio Enhancing Image Depth
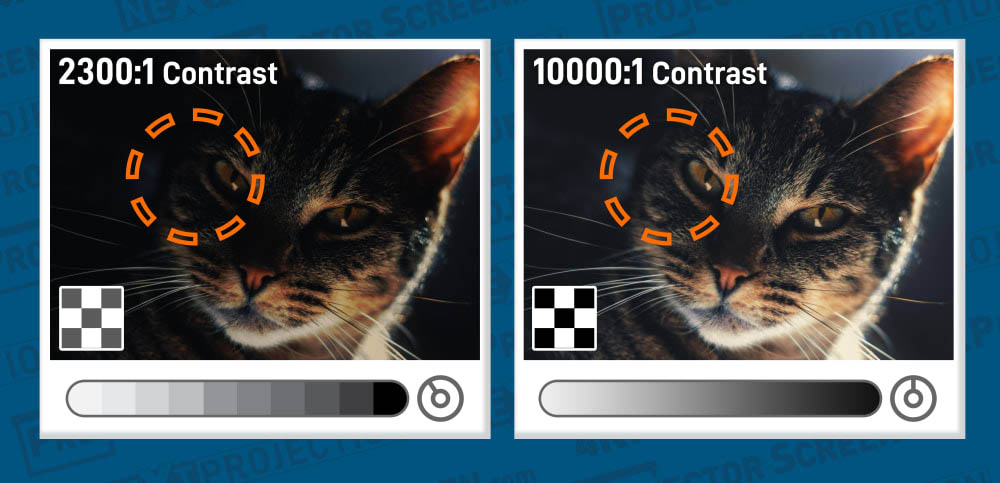
Contrast ratio plays a crucial role in defining the depth and richness of projected images.
Dynamic vs. Native Contrast Choosing the Best Ratio
Delve into the differences between dynamic and native contrast ratios. Learn how these ratios impact the visual quality and decide which one aligns better with your viewing preferences. Master the art of choosing the ideal contrast ratio when figuring out how to buy a projector.
Throw Distance Projecting with Precision
Understanding throw distance ensures your projector fits seamlessly into your space.
Short-Throw vs. Long-Throw Optimizing Your Setup
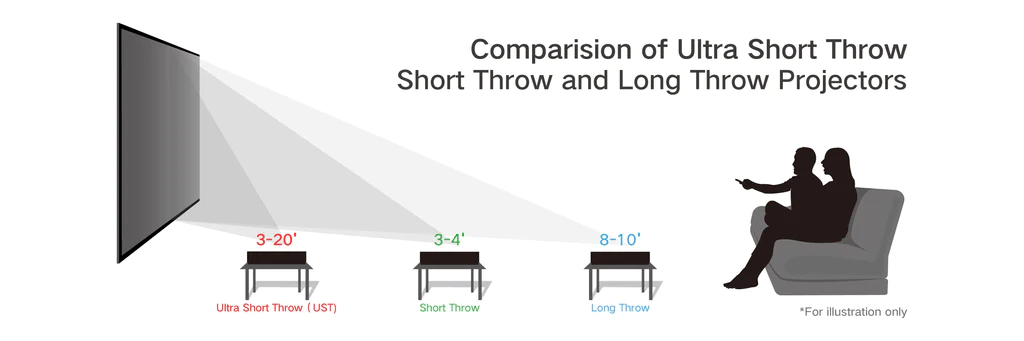
Explore the benefits of short-throw and long-throw projectors. Determine the throw distance suitable for your room size and layout. This knowledge is paramount in making a well-informed decision on how to buy a projector that perfectly complements your space.
Connectivity Options Seamless Integration
Considering the connectivity options is vital for compatibility with your devices.
HDMI, VGA, USB Navigating the Connectivity Maze
Navigate the maze of connectivity options – HDMI, VGA, USB, and more. Understand their roles and compatibility to ensure seamless integration with your devices. This section will guide you on how to buy a projector that effortlessly connects to your preferred devices.
Brand Spotlight Top Projector Manufacturers

A spotlight on renowned projector manufacturers provides insights into reliable choices.
Epson, BenQ, Sony Unveiling the Best Brands
Discover the top projector brands – Epson, BenQ, Sony – and their standout features. Gain confidence in your decision-making process by understanding the reputation and offerings of these leading manufacturers. Unveil the secrets of how to buy a projector from a trusted brand.
Price Range Balancing Budget and Features
Determining your budget is crucial, but finding the right balance with features is equally important.
Budget-Friendly vs. High-End Navigating Price Tiers
Explore the trade-offs between budget-friendly and high-end projectors. Identify the features that matter most to you and strike the perfect balance within your budget. Make informed decisions on how to buy a projector that aligns with your financial considerations.
MUST READ : How to Connect Spotify to Alexa Without App?
How to Buy a Projector?
Now, let’s dive into a dedicated section providing step-by-step guidance on purchasing the perfect projector.
Step 1 Assess Your Needs
Understanding your specific requirements is the first crucial step. Are you setting up a home theater, gaming room, or a professional presentation space? Tailor your choice based on your intended use.
Step 2 Research Brands and Models
With an array of brands and models available, thorough research is essential. Explore customer reviews, expert opinions, and consider factors like reliability, durability, and after-sales service.
Step 3 Compare Technical Specifications
Delve into the technical specifications of shortlisted projectors. Compare resolution, brightness, contrast ratio, and connectivity options. Prioritize features that align with your usage scenario.
Step 4 Check Compatibility
Ensure the projector is compatible with your existing devices, whether it’s a gaming console, laptop, or streaming device. Compatibility ensures a seamless and hassle-free experience.
Step 5 Consider Long-Term Costs
Beyond the initial purchase, consider long-term costs such as bulb replacement and maintenance. Opt for a projector with reasonable ongoing expenses.
Step 6 Seek Expert Opinions
Don’t hesitate to seek advice from experts or individuals with hands-on experience. Their insights can provide valuable perspectives on reliability and performance.
FAQs on How to Buy a Projector?
Are 4K projectors worth the investment?
4K projectors offer unparalleled image quality, making them ideal for home theaters and gaming setups. If you prioritize visual clarity and detail, investing in a 4K projector is a wise decision.
Can I use a projector during daylight?
Yes, you can use a projector during daylight, but choosing a projector with higher lumens is essential for better visibility. Consider a model with at least 2500 lumens for effective daylight usage.
How often should I replace the projector bulb?
The lifespan of a projector bulb varies, but on average, it’s recommended to replace it every 2,000 to 4,000 hours of use. Be mindful of the manufacturer’s guidelines for optimal performance.
Is a short-throw projector suitable for small rooms?
Yes, a short-throw projector is ideal for small rooms as it can project larger images from a shorter distance. This feature is perfect for maximizing space in confined areas.
Do all projectors support 3D content?
No, not all projectors support 3D content. If 3D capability is essential for you, ensure to check the specifications and confirm that the chosen projector is compatible with 3D content.
How do I prevent keystone distortion?
Keystone distortion can be minimized by positioning the projector at the correct angle and height. Some projectors also come with keystone correction features, allowing you to adjust the image for optimal clarity.
Conclusion
You’re now equipped with the knowledge on how to buy a projector. Remember to consider your specific needs, explore different technologies, and factor in maintenance for a lasting investment. Whether it’s for home entertainment or professional use, making an informed decision ensures a satisfying projector experience.